Disclosure: I am compensated for purchases made through some links on this site. Click for details.
Mold encapsulation is a technique used in the field of mold remediation, whereby a mold-infested area is treated with a sealant to prevent the spread of mold spores. This process is typically employed when the removal of the moldy material is impractical or impossible, such as with structural wood components. It involves applying a specialized coating that encases the mold in a protective barrier, effectively isolating it and preventing further contamination.
Once the decision to encapsulate mold has been made, proper preparation is crucial to ensure the efficacy of the treatment. This includes cleaning the affected areas as thoroughly as possible and addressing any moisture issues that could lead to future mold growth. After the mold is encapsulated, ongoing monitoring and control strategies are necessary to maintain a mold-free environment.
Key Takeaways
- Mold encapsulation contains existing mold contamination using a sealant.
- Preparation and moisture control are critical for successful encapsulation.
- Continuous monitoring is essential after encapsulation to prevent recurrence.
Understanding Mold
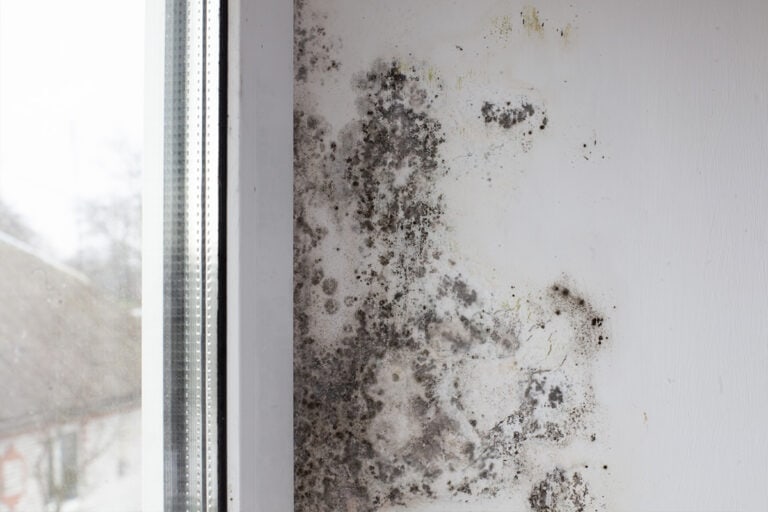
Mold is a type of fungus that thrives in moist environments and reproduces by releasing microscopic particles called spores into the air. These spores can initiate mold growth on various surfaces when they encounter favorable conditions of moisture and nutrients.
Types of Mold
There are countless species of mold, but they can broadly be categorized into three main types: Allergenic, Pathogenic, and Toxigenic molds. Allergenic molds are typically not life-threatening but can cause respiratory or allergic reactions. Pathogenic molds can cause infections, particularly in individuals with compromised immune systems. Lastly, Toxigenic molds, such as Stachybotrys chartarum, also known as black mold, produce toxic substances that can lead to serious health effects.
Health Implications of Mold Exposure
Exposure to mold and its spores can lead to various health issues, especially when exposure is prolonged or the mold growth is extensive. Symptoms may range from mild allergic reactions, such as sneezing and itchy eyes, to more severe impacts like respiratory distress or in some cases, toxic reactions if the mold is of a toxigenic variety. Individuals with respiratory conditions or weakened immune systems are at a higher risk for adverse health effects from mold exposure.
Basics of Mold Encapsulation
Mold encapsulation is a remediation technique that involves sealing off mold-contaminated surfaces to inhibit further growth or spread. This method is typically employed when mold removal is not feasible, providing a barrier between the mold and the indoor environment.
Encapsulation vs. Removal
Encapsulation should not be confused with the removal of mold. Removal involves physically taking out all mold-infested materials from the structure. However, when removal is impractical or likely to cause further damage to the property, encapsulation is an alternative. During encapsulation, a specialized sealant is applied over the mold, which then becomes inert and contained.
Benefits of Encapsulation
Encapsulation offers several benefits over traditional removal techniques. It is often less intrusive and can be completed more quickly, reducing downtime for homeowners or occupants of the building. Furthermore, encapsulation can act as a long-term preventative measure by providing a seal that not only contains existing mold but also helps protect against future microbial growth on the treated surfaces.
Mold Remediation Process
The mold remediation process involves a series of steps designed to address and mitigate mold issues safely and effectively. It is a specialized operation that requires careful planning and execution to ensure mold is thoroughly removed or contained without further contaminating the environment.
Initial Assessment
The first step in mold remediation is the Initial Assessment. Specialists conduct a thorough examination of the affected area to identify the extent of the mold growth and the source of moisture contributing to the issue. They typically use tools like moisture meters and infrared cameras to detect hidden spots of mold. Based on their findings, they develop a remediation plan that outlines the necessary actions to address the mold problem.
Containment and Cleaning
Once the initial assessment is complete, the next phase is Containment and Cleaning. Remediation workers isolate the contaminated area to prevent the spread of mold spores during the cleanup process. This is typically done using plastic sheeting and negative air pressure. After containment, the team cleans and disinfects the area, utilizing HEPA vacuums and antimicrobial agents to remove mold from non-porous surfaces and discarding porous materials that cannot be adequately cleaned.
Encapsulation Method
For surfaces where mold cannot be fully removed or doing so is not viable, professionals may opt for the Encapsulation Method. This involves applying a mold-resistant coating to the affected area to encapsulate and seal the existing mold. It is a protective measure that also inhibits future mold growth. However, this method must follow proper mold cleanup and the area should be completely dry to prevent sealing in moisture or active mold growth.
Materials and Tools for Encapsulation
In the process of mold encapsulation, selecting the right materials and utilizing the appropriate tools are crucial for effectively sealing mold and preventing its return. This involves the strategic use of sealants and fungicides tailored for specific surfaces and environmental conditions.
Choosing Appropriate Sealants
When dealing with porous materials such as unfinished wood as well as semi-porous materials like concrete, one must choose a sealant that can penetrate these surfaces and seal the mold effectively. For wooden surfaces and wooden studs, products like Foster 40-50 are highly recommended due to their proven efficacy in not only trapping mold but also preventing future growth. It’s critical to verify the product’s compatibility with the specific material and confirm its resistance to moisture, which is a key factor in mold recurrence.
Applying Fungicides
Before encapsulating mold, treating the affected area with a fungicide is advised to kill any residual mold spores. This step often involves applying a fungicidal agent to the area, which may require sanding mold-affected surfaces for better penetration. When using fungicides, one must ensure they are suitable for the surface being treated and that they conform to safety standards, particularly in spaces that may contain lead or other hazardous substances. Precise application methods, often detailed on the product label, will vary depending on the type of fungicide and the surfaces being treated.
Preparation for Encapsulation
Proper preparation is critical to the success of mold encapsulation. It involves meticulous surface preparation and managing environmental conditions to ensure the encapsulant adheres and performs effectively.
Surface Preparation
The surface requiring encapsulation must be thoroughly inspected and cleaned. It is imperative to remove all loose debris, dust, and previous coating materials. Surfaces should be dry, as moisture can hinder the adherence of the encapsulating material. Sealants are often applied to gaps and cracks to prevent future moisture ingress and to provide a smooth substrate for encapsulation.
Environmental Conditions
Encapsulation requires specific environmental conditions to be effective. The area should maintain a temperature that is conducive to drying and curing the encapsulant, typically between 60-90 degrees Fahrenheit. Humidity levels should be controlled, ideally being kept low to facilitate proper curing, and to prevent moisture from compromising the coat. Adequately ventilated conditions are crucial throughout the application process to ensure the safety of individuals and the integrity of the encapsulation material.
Executing the Encapsulation
In the context of mold abatement, encapsulation involves a specific set of actions designed to seal mold within a material. The process requires careful attention to the methods used to apply encapsulants and to the conditions that must be maintained for the products to cure effectively.
Application Techniques
Encapsulants are typically applied using a spray, brush, or roller, dependent on the specific product’s viscosity and the size of the area being treated. When spraying, technicians must maintain a consistent coat thickness as recommended by the encapsulant manufacturer to ensure an effective barrier is formed. Thicker coats may be necessary for porous materials, whereas non-porous surfaces could require a thinner layer of encapsulant.
Drying and Curing
Once applied, the encapsulant must dry and cure adequately before the area can be considered encapsulated. Drying times will vary based on the encapsulant’s viscosity, the application thickness, and environmental factors such as humidity and temperature. The area must remain well-ventilated during this phase to ensure that the encapsulant cures properly, creating a durable seal that prevents future mold growth.
Post-Encapsulation Steps
After the process of encapsulating mold, it is crucial to conduct a thorough Quality Inspection and establish a rigorous Maintenance and Monitoring program to ensure the long-term effectiveness of encapsulation.
Quality Inspection
Immediately following the encapsulation, professionals need to inspect the treated areas to ensure all wooden studs and surfaces are fully covered with no missed spots. During this inspection, they should also verify that the encapsulant has adhered properly and created a seamless barrier over the mold. A detailed checklist including visual examination and surface sampling can assure that the encapsulant has been applied correctly.
Maintenance and Monitoring
Post-encapsulation, a maintenance plan needs to be put in place. This includes regular visual inspections for any signs of mold regrowth or moisture accumulation, particularly on wooden structures prone to absorbing moisture. Homeowners should also be vigilant about the presence of any strong odors that might indicate a breach in the encapsulation. They must ensure proper disinfectant protocols are followed in the event of new mold spots and maintain a dry environment to prevent future mold growth.
Encapsulation in Different Environments
Encapsulation techniques must be carefully selected based on the specific conditions and materials present in an environment. This section explores encapsulation practices tailored for both crawl spaces and attics as well as living spaces.
Crawl Spaces and Attics
In crawl spaces, encapsulation serves as a defensive layer against moisture for both porous and semi-porous materials. These areas often contain exposed insulation and support beams that benefit from a controlled humidity environment to prevent mold and mildew growth. For attics, encapsulation can include reflective materials to enhance energy efficiency by maintaining temperature stability.
Living Spaces
Living spaces require encapsulation solutions that balance durability and health concerns. For porous surfaces such as wood and plaster, encapsulation often involves a breathable, yet protective, coating that ensures indoor air quality is not compromised. Semi-porous materials like brick and concrete can be treated with sealants that protect against moisture while maintaining the integrity of the material’s surface.
Prevention and Control Strategies
Efficient strategies for mold prevention hinge on rigorous moisture management and regular property upkeep. These measures are crucial in mitigating mold growth and ensuring indoor air remains safe for occupants.
Moisture Control
One must maintain a low indoor humidity level, ideally between 40-60%, to discourage mold growth. Tools such as dehumidifiers and exhaust fans are effective in keeping indoor air dry, while proper ventilation ensures a continuous flow of fresh air. Ensuring that water does not accumulate anywhere in the property is vital, as mold spores thrive in moist environments.
Regular Maintenance
Regular inspections and upkeep of the property can prevent mold spores from becoming a larger issue. This includes cleaning and drying areas of water spillage, repairing leaks in roofs, windows, or pipes promptly, and ensuring gutters are clean and directing water away from the building. Being proactive in maintenance routines significantly reduces the risk of mold colonization, protecting both the structural integrity of the property and the health of its inhabitants.
Professional Mold Encapsulation Services
Professional mold encapsulation services are essential for effectively addressing mold issues within a property. These services provide a long-term solution to mold growth, particularly in damp or high-humidity areas, by isolating mold from the home environment.
When to Hire a Professional
Homeowners should consider hiring a professional mold encapsulation service when dealing with persistent mold problems that cannot be resolved through regular cleaning. It is particularly important to engage professionals when mold infiltrates areas that are difficult to access, like crawl spaces. A homeowner’s guide to mold remediation suggests seeking expert help if the affected area is large or if health concerns are present due to mold exposure.
Choosing the Right Service Provider
To choose the right service provider for mold encapsulation, homeowners should verify that the company has certified mold removal professionals who follow established guidelines to ensure that mold is safely and effectively isolated from the living space. It’s crucial to evaluate their experience, insurance, and the encapsulation methods they employ.
Related Content: What is an IICRC Certification? All Divisions and Their Certifications
DIY Mold Encapsulation
When tackling mold encapsulation, homeowners must prioritize safety and adhere strictly to a systematic process. It’s a method to contain and manage mold in places like attics or crawl spaces by sealing it off with specialized materials. A well-executed encapsulation can prevent further mold growth and improve insulation, contributing to a safer and healthier home environment.
Safety Precautions
Before beginning the encapsulation process, individuals should equip themselves with protective gear including gloves, goggles, and a respirator to avoid mold spore inhalation. The work area must be well-ventilated and all materials and tools should be gathered beforehand to ensure a smooth workflow. Homeowners should also consult professionals or a homeowner’s complete guide to mold remediation to fully understand the scope of safety measures required.
Step-by-Step Guide
- Inspection: Carefully inspect the affected area to determine the extent of mold growth and the source of moisture contributing to the problem. Mold encapsulation is most effective after addressing the root cause of moisture to prevent future issues.
- Cleaning: Remove any loose debris and clean the area with a HEPA-vacuum or mold-specific cleaning agents. The space must be completely dry after cleaning to ensure the efficacy of encapsulation.
- Preparation: Repair any structural damages and seal leaks or cracks to enhance insulation and avert moisture penetration. The preparation stage is crucial in laying a solid foundation for successful mold encapsulation.
- Encapsulation: Apply a mold-resistant sealant or encapsulant paint to the cleaned areas. It is essential that the product used is specifically designed to combat mold and is applied evenly across all contaminated surfaces.
- Verification: Once the encapsulant has dried, perform a thorough check to confirm that the entire affected area has been addressed. Homeowners should seek to accomplish not just containment but also advancements in the home’s insulation and moisture control.
- Maintenance: Regularly inspect the encapsulated area to ensure continued effectiveness. Keeping the area dry and well-insulated helps maintain the integrity of the encapsulation and contributes to overall mold prevention.
Conclusion: Simplifying Mold Control with Encapsulation
Encapsulation is a key strategy in mold remediation, offering a practical way to handle mold where removing it isn’t an option. This guide has explored encapsulation in depth, showing it’s more than just applying a sealant; it’s about taking a comprehensive approach to ensure a mold-free space. Here’s a summary of what we’ve learned:
Key Insights:
- Effective Mold Barrier: Encapsulation acts as a strong barrier, stopping mold from spreading by sealing it off from its surroundings.
- Preparation is Crucial: Success in encapsulation depends on thorough cleaning and moisture removal before applying any sealant.
- Why Choose Encapsulation: It’s less disruptive and often more cost-effective than removal, with the bonus of preventing future mold issues.
This guide strives to demystify mold encapsulation, providing a straightforward approach to maintaining a healthy, mold-free environment. Encapsulation, when done right, is a reliable method to protect your space from mold, offering peace of mind and a safer living area for everyone.